Rich Markup from customisable Markdown in Umbraco
- Matt Bliss
- 09 Jan 2025
A write up of a successful experiment to achieve rich customisable markup using the Markdig[1] markdown package in Umbraco 15
Why an experiment with Markdown?
The following few paragraphs are background: the why and the how. For the TLDR skip to Implementing a customised markdown editor and get straight to the code.
I wanted to make my personal blog in the style of the printed page, a magazine article or a page from a book perhaps. This can partly be achieved by layout, but a larger part comes from the typography. As this is a technical blog I also wanted the typography to contain features such as in-line references linked to a footnotes section at the bottom of the page, and acronyms like RTE, for example, correctly marked up with the <abbr> tag.
A previous experiment
I had previously experimented with blocks in the rich-text editor with Umbraco 13[2] for the same purpose. Blocks in the RTE now support inline elements mid sentence, something not previously possible with the now defunct macros[3]. This could be used for footnotes and acronyms. However, my experiment with this technique had a few usability issues in the TinyMCE rich text editor, and with Umbraco 15 now introducing the Tiptap[4] editor, I parked[5] this experiment and looked for another approach. While looking I came across Markdig[1].
Why not use the Standard Umbraco Markdown Editor?
The standard Markdown editor doesn't have out of the box support for footnotes and acronyms and I was looking for a quick solution so didn't have time to trawl through the Umbraco source code and start reverse engineering to add the features I was looking for.
Implementing a customised markdown editor
My implementation is incredibly simple, first install Markdig[1] in the project
Install Markdig
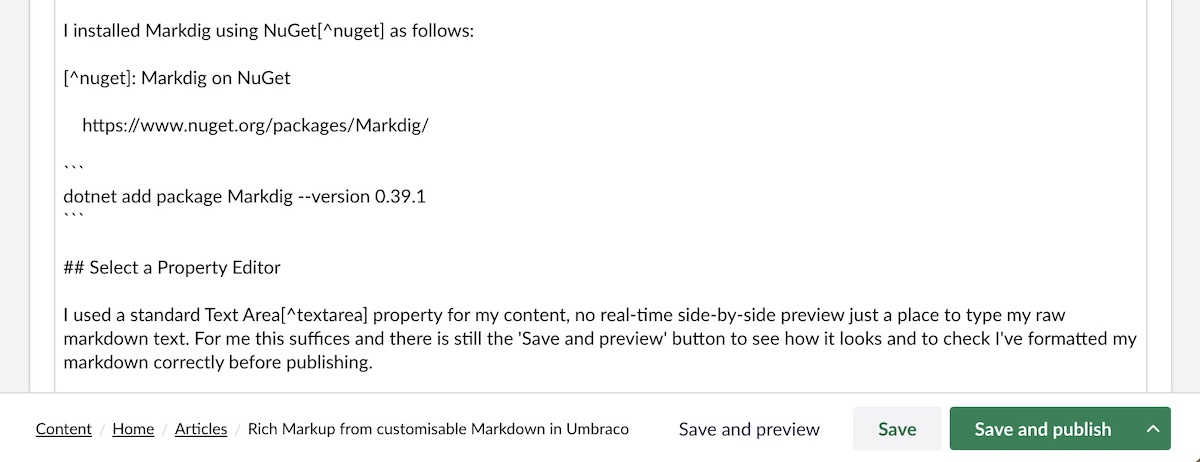
I installed Markdig using NuGet[6] as follows:
dotnet add package Markdig --version 0.39.1
Select a Property Editor
I used a standard Text Area[7] property for my content, no real-time side-by-side preview, just a place to type my raw markdown text. For me this suffices and there is still the 'Save and preview' button to see how it looks and to check I've formatted my markdown correctly before publishing.

Wire the markdown into the view
The Markdig documentation shows how incredibly simple it is to use[8] and based on that I've created a simple Markdown Helper class as follows to convert the Markdown to HTML.
public static class MarkdownHelper
{
    public static string ToMarkup(this string markdown)
    {
        var pipeline = new MarkdownPipelineBuilder()
            .UseAdvancedExtensions()
            .Build();
        return Markdig.Markdown.ToHtml(markdown, pipeline);
    }

    public static HtmlString ToHtmlString(this string markdown)
    {
        return new HtmlString(markdown.ToMarkup());
    }
}
A simple call to the extension method in a view will render the HTML
@Model.MyProperty.ToHtmlString()
That's it for the basic implementation
- an out of the box property editor
- a NuGet install
- a tiny extension method
Customising the output
There are a few places where I wanted to change the output that the standard renderers in Markdig provide to match my specific requirements and because of the way Markdig is implemented this is easy to do. However, extending Markdig is a good subject for a future article, so watch this space!
Footnotes
Mardig, a fast, powerful, CommonMark compliant, extensible Markdown processor for .NET by Alexandre Mutel
Macros were removed from the RTE in Umbraco 14
With Umbraco 15 the new default RTE is Tiptap
https://docs.umbraco.com/umbraco-cms/fundamentals/backoffice/property-editors/built-in-umbraco-property-editors/rich-text-editor
Markdig on NuGet
Umbraco Text Area property editor
https://docs.umbraco.com/umbraco-cms/fundamentals/backoffice/property-editors/built-in-umbraco-property-editors/textarea
The 'Usage' section of the Markdig documentation
https://github.com/xoofx/markdig?tab=readme-ov-file#usage